A Ruptured Landscape

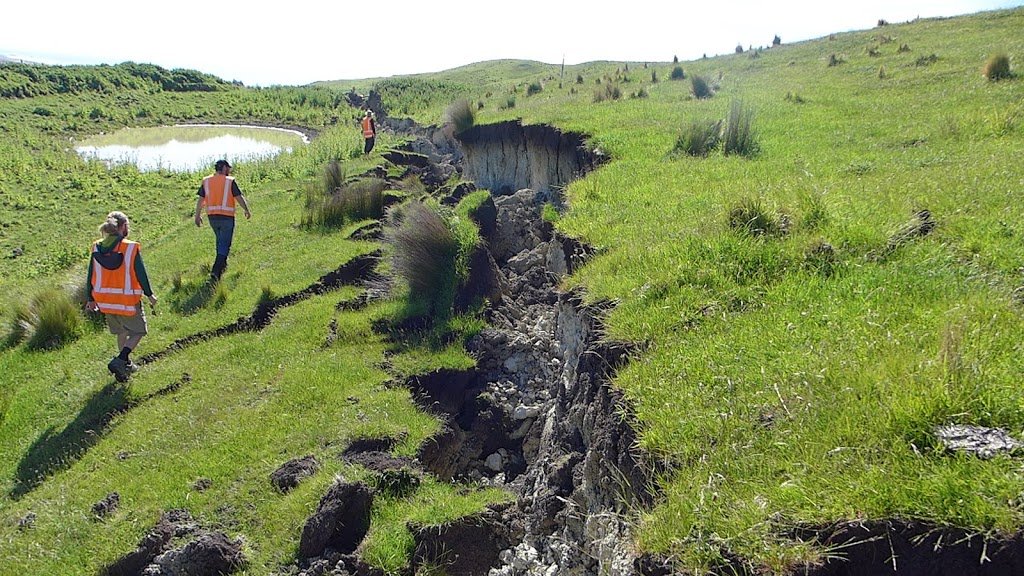
J,.Thomson @ GNS Science On the ground in the Kaikoura Quake aftermath: Following the recent M7.8 Kaikoura Earthquake, a number of teams of scientists have been deployed to survey the geological impacts and assess the potential ongoing risks to people and infrastructure. This gallery of images shows some of the numerous dramatic impacts of the quake in the coastal area to the north of Kaikoura.  J.Thomson @ GNS Science Accessing the area by road involves careful driving. The road surfaces next to many of the bridges have subsided, creating a crack at either end of the bridge:  J.Thomson @ GNS Science Slumping has occurred along parts of the highway:  J.Thomson @ GNS Science This photo shows the now famous house at Bluff Station that had the mis-fortune to be built directly on top of the Kekerengu Fault. The house was shunted about 7 metres sideways leaving some of its foundations behind. J.Thomson @ GNS Science  The house was pushed across its own driveway… J.Thomson @ GNS Science  The coastal highway and railway have unfortunately been cut through in several places by fault ruptures. This view looking south at Waipapa Bay shows the northern branch of the Papatea Fault crossing SH1 and heading out to sea. J.Thomson @ GNS Science This is what the road now looks like on the ground. The fault scarp has been bulldozed to allow vehicle access. J.Thomson @ GNS Science A short distance away, the railway line was lifted up and dropped in the grass next to its original gravel bedding. J.Thomson @ GNS Science From the top of the fault rupture, you can see that the displaced railway tracks extend for about 300 metres into the distance. Will Ries @ GNS Science A few hundred metres further south, the southern branch of the Papatea Fault crosses the road and railway. J.Thomson @ GNS Science The earthquake ripped right through the concrete culvert that ran under the road, and again lifted the railway off its bed. J.Thomson @ GNS Science From the air, the scarp of the southern branch of the Papatea Fault is seen to extend like a knife-cut across the shore platform. In this image you can sea the uplifted coastline extending into the distance. The total uplift of the area left (east) of the fault is 5 to 6 metres, whilst the area to the right was uplifted by a smaller amount. Water has been ponded up against the new fault scarp. J.Thomson @ GNS Science A helicopter view showing the scarp of the Papatea Fault close up (across the top of image). The fault movement is thought to have been mostly horizontal with about 2 metres of vertical uplift in addition. J.Thomson @ GNS Science The Papatea Fault scarp is a sheer wall about 2 metres high. J.Thomson @ GNS Science Part of the task for scientists is to measure the uplift along the coast. The high and low water marks make a useful reference point that can be surveyed against the new sea level positions. J.Thomson @ GNS Science Sadly the raised shoreline stranded innumerable sea creatures that now litter the area amongst the seaweed. J.Thomson @ GNS Science Rockfalls have been numerous, and have caused a lot of damage where the road and railway are squeezed up close to the coastal cliffs. J.Thomson @ GNS Science The end of the road? The reason why you won’t be travelling into Kaikoura from the north anytime soon. This rockfall is at the south end of Okiwi Bay, and there are more slips like this further south. There are several GeoTrip locations that you can visit to see the changed landscape along the Kaikoura Coast such as this one 

A Ruptured Landscape Read More »

Tracking Dinosaurs in NW Nelson

Greg Browne. Image Julian Thomson @ GNS Science In New Zealand there is only one area (with six individual locations not far from each other) in which dinosaur footprints have been identified. This is in NW Nelson in the South Island. They were discovered and researched by Greg Browne, a sedimentologist at GNS Science who has spent many years doing geological fieldwork in the area. The first announcement of their discovery was in 2009 as shown in this video. Dinosaur footprints near Rovereto, Italy. Image J Thomson When compared to the easily recognisable dinosaur trails that are found in other parts of the world, the structures that have been classified as footprints in New Zealand are not initially obvious.  The photo shows an example from near Rovereto in northern Italy where each footprint is about 30 cm across. Image Julian Thomson @ GNS Science In comparison, the New Zealand examples are irregular in shape and position. It took a lot of research and a process of elimination to be certain that these structures are indeed trace fossils of dinosaurs, rather than originating from another biological or mechanical cause..  In order to be able to point at a dinosaur origin for these impressions, there are several factors that have to be considered. As a starting point we can look at horses on a modern beach: Image: Van der Lingen, G.J. & Andrews, P.B This photo was taken by researchers who investigated horse hoof marks that were imprinted on a beach sand in New Zealand (from van der Lingen, G.J. & Andrews, P.B. 1979, Journal of Sedimentary Petrology). They carefully cut a vertical slice through the imprint to study the details of how the horizontal layers of sand were deformed by the weight of the passing animal. The hand lens shows the scale: Base image: Van der Lingen, G.J. & Andrews, P.B There are essentially three ways in which the original sediment has been affected:(A) – Jumbled particles and blocks of sand have  fallen into the depression made by the footprint.(B) The footprint has a clear vertical margin on either side(C) The sediment underlying the footprint has been compressed downwards.   It is most likely that these horse footprints were soon eroded after their formation in the late seventies, due to tides, storms, wind or even the action of shore creatures such as crabs, worms or shellfish. On the other hand, there is a small possibility that they were  preserved quickly beneath a new layer of sand and are still intact beneath this protective covering. Base image: Van der Lingen, G.J. & Andrews, P.B Over geological time, sediments such as these can become buried deeply, compressed into solid rock and later revealed by uplift and erosion at the modern land surface. In the case of the horse footprint, its appearence on the surface (in 2 dimensions)  would then depend on the amount and angle of erosion. For example, if it is were eroded near to the top of the footprint (the level of line 1 in the photo) it would appear relatively large compared to if the erosion had removed most of the material, and only the lower part of the footprint were showing (line 2). Similarly if a vertical section of the footprint were to  be exposed, its size and appearance would differ depending on whether the section that was revealed represented the centre of the footprint (3) or its edge (4). Image Greg Browne @ GNS Science Here is an example of one of the footprints that Greg identified in the Upper Cretaceous rocks of Nelson. It shows similar features in cross section to the horse footprint (at approximately the same scale)- the infilling (A), the distinct margin (B) and the compressed underlying layers (C). Image Greg Browne @ GNS Science Here is another example of a vertical slice through a footprint, with the dotted line highlighting the distinct margin of the structure: Julian Thomson @ GNS Science This photo shows a footprint eroded horizontally. The heel has cut a sharp edge into the sediment at the back end of the feature (lower left), while the front has been compressed into ridges as the foot tipped forwards during locomotion (near finger).   Having confirmed these features as footprints being preserved in sediment from an intertidal environment, the question then arises as to whether animals other than dinosaurs could have made them. Having tackled this question over many years, Greg Browne worked through the following possible examples and discounted them for the reasons given:  Fish feeding or resting traces: depth of penetration and lack of deformed strata below. Amphibian foot prints: unlikely to have an amphibian large enough. Bird foot prints: bird would have to be large and heavy. Mammals: the only pre-Pleistocene mammals known from New Zealand are Early Miocene mouse-like fossils. Evidence throughout the world indicates that Cretaceous mammals were small, and did not develop into large animals until after the end of the Cretaceous extinction event and the demise of the dinosaurs. Reptile foot prints: dinosaurs: only dinosaurs would be of sufficient size and weight to have generated these deformed point source compression structures. Recently, with funding from the Unlocking Curious Minds Fund of the Ministry for Business, Innovation and Employment (MBIE), a team from GNS Science were assisted by teachers and students of Collingwood Area School, to clean up a large rock slab in the search for more dinosaur footprints. With a lot of hard work, involving cleaning mudoff the rocks with buckets of water, brooms and shovels, some hitherto unseen dinosaur footprints were revealed for the first time since the Cretaceous Period, about 70 million years ago. Here are some quotes from our assistants:“It was a wonderful once-in-a-lifetime opportunity to work with a team of scientists and look at a real dinosaur footprints.” “It was an honor and very humbling knowing that we were the first people to see these footprints in 70,000,000 years.” “It was an incredible opportunity. We were able to work alongside

Tracking Dinosaurs in NW Nelson Read More »

Digging into the Alpine Fault

The Alpine Fault has been the focus of a lot of research over recent years, including the Deep Fault Drilling Project, Alpine Lake Sediment Research and the Earthquake Records at Hokuri Creek amongst them. These are building a much clearer picture of the history of previous fault ruptures, and allowing better estimates of the size and likelihood of future earthquakes. The Alpine Fault is a long, straight, geologically  fast moving fault that typically produces very large earthquakes rupturing along large segments of its total length. At its northern end the Alpine Fault branches into a number of different faults that cross Marlborough and are known as the Marlborough Fault System. This means that here the Alpine Fault only takes up a proportion of the total displacements in this region and is likely to have a different earthquake history compared to thecentral and southern parts of the fault. Recently a GNS Science expedition to the northern part of the Alpine Fault near Springs Junction, involved digging two trenches across it to better understand its local earthquake history through some careful investigation. This location features as one of our GeoTrips that you can visit. www.geotrips.org.nz/trip.html?id=59 . This image shows the trenches (left of centre foreground) from the air. The trace of the Alpine Fault passes through the trenches and into the distance between the hills. Once the trench has been dug out,  the walls need to be cleaned up carefully so that the fine detail of the different sediments and structures can be observed and recorded. A string grid is pinned against the walls of each trench to help map them out, and markers are placed to highlight significant features that can sometimes be very hard to discern. The leader of this project is Rob Langridge, shown here having a close look at the detail. Many hours are spent drawing accurate maps of the trench walls as well as taking high resolution panoramic images of them. These are taken in order to document the excavation so that later interpretation of the data can continue once the trench has been filled up and the team has returned to the office. This image shows the Alpine Fault in section with the line of the fault shown.  The scarp or slope at the ground surface has been produced by earthquakes uplifting the left hand (eastern) side.You can also see the effect of fault movements on the river sediments below the ground. The grey clay layer on the left has been cut off at the fault and the overlying gravel layer has been dragged out of shape by repeated fault movements. This is a close up view showing the complexity of the sediments and structures close to the fault. When earthquakes uplift ground on the left side of the fault, loose material at the surface collapses across the fault and forms a wedge shaped pile of sediment on the ground called a colluvial wedge.These earthquake associated layers later get buried by younger material. They can be very hard to identify, but are a critical record of past ruptures. They can form repeatedly, so that wedges from earlier earthquakes may have more recent colluvium laid over the top of them. Once the colluvial wedges have been identified, the next step is to look for plant or animal material that has been trapped in them at the time they were created. These carbon rich specimens are carefully collected for dating in the lab using the radiocarbon dating method. (See below for a video that explains carbon dating) When a major fault ruptures during an earthquake, it can branch out near the ground surface to produce a number of smaller faults close to the main fracture. Here is an example that showed up in the trench wall a few metres from the main fault. The layers on the right have been pushed up  relative to those on the left. By carefully observing which layers have, or have not been affected by these secondary faults, the earthquake record can be further clarified. Once all the data and specimens have been gathered and logged, the trenches are filled in once more so that the surface can revegetate back to its original state. Here is a 3 minute video of the project: And this video explains radiocarbon dating: Finally click here for the TVNZ news report on the trenching.

Digging into the Alpine Fault Read More »

Lahars on Ruapehu

Ruapehu Eruption, Image: Lloyd Homer@GNS Science Ruapehu is very popular with skiers, trampers and other adventurers. As an active volcano with the potential for sudden eruptions through its crater lake, Ruapehu presents the Department of Conservation with a significant hazard management issue. Lahars on Ruapehu: Image: Lloyd Homer@GNS Science Obviously there is the possibility of people in the vicinity of the summit area being immediately affected by water, rocks and ash thrown out by an eruption. An additional hazard is that displaced water and sediment from the crater lake can mix with snow and loose volcanic material to create fast moving mudflows (lahars) which descend rapidly down valleys radiating away from the summit. The collapse of the crater wall can also cause a lahar to flow down the Whangaehu Valley to the east of Ruapehu, independently of an eruption. It was this type of lahar that caused the railway tragedy at Tangiwai in 1953. This video explains the basics of lahars at Ruapehu and the two ways they can be created: Image Graham Leonard@GNS Science Not surprisingly, due to the high number of mountain users, the lahar hazard has been studied in detail and measures put in place to give warnings and reduce the potential impact on people and infrastructure. This has involved a close collaboration between GNS Science (GeoNet), the Department of Conservation and Ruapehu Alpine Lifts who run the ski areas. First of all, regular monitoring of the crater lake’s physical and chemical properties is carried out by GNS volcanologists as part of the GeoNet project. This alerts them to changes of activity within the volcano: This information helps the GeoNet team to set the volcanic alert level for the mountain, which is important for a number of agencies such as the air industry, Regional Councils, local businesses and others. Because of the potential for some eruptions to occur with little or no warning, and the speed with which lahars travel down the slopes, there is also an Eruption Detection System (EDS) in place. This is triggered when both ground-shaking (seismic waves) and an air blast are detected within a short time of each other at a number of monitoring stations throughout the Tongariro National Park. This image shows the arrivals of volcanic earthquake tremors (top) and the air blast (bottom) of an eruption, at a station about 9 kilometres from the crater lake: You can see that there is a time lag of about 30 seconds between the onset of groundshaking and the arrival of the air blast at the same station. The EDS system has been developed by GeoNet and is unique in the world. A detected volcanic eruption will automatically set off the Lahar Warning System, consisting of loudspeakers that warn people in the ski areas to get out of valleys that could be affected, and onto high ground nearby. This video describes the system that has been set up to protect skiers on the mountain and how it is tested for its effectiveness: There is also a lot of information displayed visibly at key points in the ski areas and surrounding facilities and communities to explain the lahar hazard, and what to do or not to do if a warning alarm is sounded:

Lahars on Ruapehu Read More »

Beneath New Zealand 1 Documentary

Making Movies is an Auckland based film company that creates adventure and nature documentaries. I was asked to help with the script editing and presentation on a movie about the mountains of New Zealand. This involved spending time with the film team in the Southern Alps, amongst some of the most spectacular landscapes in New Zealand. We spent several days in the Aoraki Mount Cook massif. In this photo we are arriving on the Grand Plateau. The environment required full mountaineering security due to the massive drop offs and crevasse hazard The light changed constantly to pick out the landscape features in a way that I found continually fascinating to watch. We also spent some time on the Tasman Glacier and in some of the surrounding peaks: Team photo on the Tasman Saddle, with Aoraki Mount Cook in the distance Click here to see the trailer of the doco Beneath New Zealand on the Making Movies website https://www.makingmovies.co.nz/portfolio/beneath-new-zealand/

Beneath New Zealand 1 Documentary Read More »

Precarious Boulders and Earthquakes

The National Seismic Hazard Model is the result of lots of work by scientists to indicate the likelihood of earthquakes happening in different parts of New Zealand. It is made with reference to the historic record of earthquakes that have happened across the country, combined with research into the rupture histories of many individual active faults. Work is done to continuously ‘ground truth’ and improve the Hazard Model through ongoing research and addition of data. Mark Stirling has developed a way of testing the model at particular locations using ancient landforms known as tors that occur in places around the country. These isolated boulders stand like statues. There are many of them near Clyde in Otago, occurring on the flat, uplifted surfaces of nearby ranges, such as the Old Man Range, shown here. You can see that some of these features are quite imposing and have a lot of character. Although some of them are solid looking, there are others that are very delicate.These are the ones that Mark is interested in. The basic idea is to use the beryllium 10 exposure dating method to find out how old these fragile features are, and then to work out the amount of earthquake shaking it would take to knock them down. This tells Mark the minimum amount of time that has lapsed since the occurrence of an earthquake capable of knocking down the feature. This information is then matched with the National Seismic Hazard Model to see if the calculations give similar hazard estimates. Making a numerical calculation of the fragility of the precarious feature is a matter of working out the angles between the centre of mass and the rocking points at the neck (narrowest point) of the tor. For making these calculations with maximum precision, Mark makes a 3D computer model of the tor, by first taping key points on its surface, and then taking many photos from all angles, which are later stitched together. This is what the model of the above tor looks like on the computer screen once completed . During fieldwork with Mark last month, we were able to use a quadcopter drone to get good images of some of the more inaccessible fragile landforms. Here is our video of the project:

Precarious Boulders and Earthquakes Read More »

NASA comes to Rotorua

Last week I was involved in a NASA Spaceward Bound meeting in Te Takinga Marae in Rotorua. The purpose of the meeting was to promote interest in Planetary Geology and  Astrobiology, and it was attended by about 50 scientists, educators, undergraduates and school students  from New Zealand, Australia, the USA, Romania, the UK and Kazakhstan.  Image:  NASA / JPL A large focus for NASA at present is the Curiosity Rover that has been exploring the surface of Mars for the last couple of years. One of the questions for the scientists is whether there are any traces of simple life forms in rocks on the surface. If found, these would show that whilst there may be no life at present on the red planet, it did manage to evolve there in the past under previous conditions. Image:  NASA / JPL In order to understand some of the geological features that are being observed using Curiosity’s various probes, it is useful to get to know comparable geological sites on the Earth’s surface that can be investigated and understood at close quarters. During the Spaceward Bound week we made several field trips to visit hot springs and volcanic landscapes in the Taupo Volcanic Zone. The focus of these trips was to see how microbial life can take hold in extreme physical environments such as very hot,  acidic geothermal springs, and to see how these living communities leave physical and chemical evidence of their existence (biomarkers) in the mineral formations that build up at these locations. This image shows a silica terrace at Waimangu volcanic valley. The colours are created by different species of microbes that thrive in these harsh conditions. The colour distribution shows the tolerance of particular species to different water temperatures.  For more about extremophiles in New Zealand find out about  the 1000 Springs Project. Extremophile microbes inhabit the hot mineral rich water that creates the rock formations at Pariki Stream, Rotokawa. The bacteria leave visible biomarkers in the sinter left behind as the mineral laden water evaporates. Parag Vaishampayan, a research scientist at NASA, took a close look. Quadcopter meets Rover at Rotokawa This small radio controlled rover was designed by Steve Hobbs at the University of New South Wales. It is adapted for remotely investigating hot springs, and includes a number of sensors such as spectrometers, a camera and a non contact thermometer. the quadcopter that you can also see in the picture has been adapted by Matthew Reyes, (a technologist at NASA) to scoop up water samples that can’t otherwise be easily accessed. Part of the field investigations included a study of plant colonisation of lava flows in the Mangatepopo Valley in Tongariro National Park. This photo shows a young lava flow on the slopes of Ngauruhoe volcano at the head of the valley. We also went on an excursion over the bare volcanic landscape of the Tongariro complex. Mars, as seen by Curiosity.            Image:  NASA / JPL For more information about astrobiology have a look at the New Zealand Astrobiology Initiative website, and to find out about Spaceward Bound New Zealand have a look here. Finally here is a news clip from TVNZ about Spaceward Bound, and an interview with AUT scientist Steve Pointing on National Radio.

NASA comes to Rotorua Read More »

Disaster Risk Reduction in Indonesia

GNS Science, in partnership with a team from the University Gadjah Mada (UGM) in Yogyakarta, is involved in a 5 year project to reduce the risks caused by natural disasters in Indonesia. Coastline, West Sumatra   J.Thomson@GNS Science Indonesia is a huge and very diverse country, made up of about 20 000 separate islands, with a total population of 250 000 000 people and hundreds of different local languages.  A very active plate boundary running alongside the country, along with its complex topography means that  much of Indonesia is susceptible to earthquakes, tsunamis, landslides, floods and volcanic eruptions. Population pressure forces many people to live in areas that are highly vulnerable to these hazards, such as coastlines, river banks and on the slopes of volcanoes. This small river in Palu, Sulawesi, can become a raging torrent in heavy rain. Several houses on the right bank were washed away in a flood some years ago, and yet people still live right next to the river on the opposite bank. Another disaster waiting to happen?  2004 Tsunami aftermath, G.Mackley In recent years some of the major natural disasters in Indonesia include the 2004 tsunami that devastated Banda Aceh, as well as several subsequent damaging earthquakes.  The Strengthened Indonesian Resilience – Reducing Risk from Disasters (StIRRRD) project aims to bring different agencies together in Indonesia to better prepare people and infrastructure from future such hazardous events.   Image; G. Mackley New Zealand has similar geological and environmental conditions to Indonesia, but a much smaller population. It is a much simpler matter for organisations in New Zealand to work together on common issues relating to hazards. For example science, engineering, planning, environmental management, civil defence, NGO and government agencies can share information to assist decision making processes around disaster risk reduction (DRR). This integrating capability and experience is what New Zealand can contribute to assist a larger more complex country like Indonesia in such a project. I joined the GNS Science team recently on a visit to some of the districts in Indonesia that are participating in the project. Michele Daly from GNS Science addresses a meeting in Palu. Over two weeks we travelled to Palu and Donggala (Central Sulawesi), Mataram (Lombok), and Bengkulu and Padang in West Sumatra (see project map here). We were involved in meetings and workshops with people from many agencies, and also went on several field trips to look at different environments and projects. In this video, Michele Daly from GNS Science, and Faisal Fathani from UGM, give and outline of the project:   J.Thomson @ GNS Science   Here are some images from the field trips: An active fault runs up the cliff between the brown coloured sandy rock on the left and the pale grey limestone on the right that has collapsed in a large rock fall. This is near Donggala, Central Sulawesi. J.Thomson @ GNS Science A year ago the village of Gol in Lombok was almost totally destroyed in an earthquake that lasted a few seconds. This newly rebuilt house stands next to the broken ruins of its predecessor that have yet to be cleared away. J.Thomson @ GNS Science This sea wall on the coast of North Lombok was built to protect the village next to it. Within a year of construction it was breached in a big storm and many houses were severely damaged. J.Thomson @ GNS Science This massive concrete structure being built near Bengkulu in West Sumatra is a tsunami vertical evacuation building. When completed it will be used as a community centre, with enough space and supplies on the top level for about 2000 people to escape from a tsunami at short notice. This example shows how the Indonesians are taking on significant Disaster Risk Reduction initiatives. For more information about this project and to be in touch with updates have a look at the StIRRRD Blog or ‘like’ the project on Facebook.

Disaster Risk Reduction in Indonesia Read More »

Bottom Hole Assembly

About 10 days ago, drilling was stopped at the Alpine Fault drill site so that geophysical measurements could be made down the borehole, and the bit could be replaced. This involved lifting all of the drill rods out one by one and stacking them next to the rig. Next to come up was the bottom hole assembly (BHA) comprising these thick steel pipes that Rupert Sutherland is describing to the camera in this image. Last to appear was the business end of the drill string including the drill bit itself. This photo shows the bit being replaced using some impressive sized hand tools: The view looking down into the top of the borehole – 400 metres deep and filled with mud. Here is the video of Rupert explaining the Bottom Hole Assembly: Once the geophysical measurements were taken down the hole (more about these later), the Bottom Hole Assembly was put back together and lowered back down the borehole. Unfortunately disaster struck when the wire snapped and 7 tonnes of unattached BHA dropped down the hole. To cut a long story short, this delayed progress for about a week, until finally the detached parts were fished out of the hole using a variety of highly specialised methods. You can read a little more about these events here in Rupert’s Blog:1.The Calamity.  2. Landing the Fish 

Bottom Hole Assembly Read More »

Phase 2 Alpine Fault Drilling

Rupert Sutherland with DFDP-2 flags Whilst researchers continue to pull together the history of past Alpine Fault earthquakes, the Deep Fault Drilling Programme is well underway in Whataroa on the West Coast of the South Island. For an introduction to this project have a look at my blog and video here, or check out the DFDP-2 Facebook page or project leader Rupert Sutherland’s blog for updates over the next few weeks. The first phase of the drilling process was to penetrate down through a thick sequence of gravel and mud left behind in the Whataroa Valley after the retreat of ice at the end of the last ice age. This was surprisingly challenging because of a thick sequence of very sticky mud that was deposited in the valley at a time when it was a deep fiord or lake. DFDP-2 drill site   J.Thomson@GNS Science Eventually the team struck bedrock 240 metres below the surface, and the second phase could commence. This involves drilling down towards the fault plane, thought to be about a kilometre below the rig, without trying to retrieve any large intact pieces of the rock at this stage. (That process is the goal of phase three, which will start when the geologists see from the minerals in the rock fragments that the drill is closing in on the Alpine Fault.) DFDP-2 drill site   J.Thomson@GNS Science This is a view of the drill site on a nice morning with Phase 2 well established and the drill at a depth of 340 metres. Behind the rig you can see the drilling mud ponds. The science labs are on the right and spare drilling rods that are added as the drill gets deeper are in the foreground. The labsin the background are where the scientists  study the rocks being brought up by the drill, and make geophysical measurements taken by equipment that is lowered down the borehole. Close up to the rig you can see the vertical drill rod (or pipe) that is rotating and gradually descending down the drill hole. The next rod is lined up ready for connecting when the drill is a few metres deeper. The speed of drilling is roughly 1 to 4 metres an hour at this stage, and a new drill rod is added about every 6 hours. Next to the drill is this pond of muddy water, which is a vital part of the system used for cutting down into the rock. The mud is specially formulated to have the right viscosity and density and is sucked up by a very powerful pump. After having large particles sieved out of it, it is sent down the centre of the drilling pipe right down to the cutting face of the drill bit. The drill bit on the right has cut through about a hundred and twenty metres of bedrock, and is about to be replaced by the nice shiny one on the left. The drilling mud is forced out of the holes that you can see, and then flows up the outside of the drill pipe back to the surface, bringing with it the rock chips and also carrying heat away from the cutting face at the same time. This is the base of the drill rig, with a section of the rotating drill pipe visible. Drilling mud is flowing down the centre of it on its way down to the drill bit. After its return journey on the outside of the drill pipe, loaded with rock fragments, it emerges at ground level and is carried away in the pipe that extends to the right. The drilling mud flows into a collection pond. The sieve that you see is for collecting samples of the rock fragments for analysis. The samples are first carefully washed of fine mud or clay. They are then sorted by hand. After being glued to a microscope slide, the rock samples are ground down to a thickness of 30 microns. They are then transparent and can be analysed using an optical microscope. The mineral content can then be studied in detail. As the drill gets closer to the fault, the scientists expect to be able to see changes in the types of minerals present. In this way they will be able to judge the right time to change the drilling system to phase 3 and start retrieving intact rock cores. DFDP-2 drill site   J.Thomson@GNS Science Finally here are a couple more views of the DFDP-2 drill site looking up the Whataroa Valley. DFDP-2 drill site   J.Thomson@GNS Science

Phase 2 Alpine Fault Drilling Read More »